
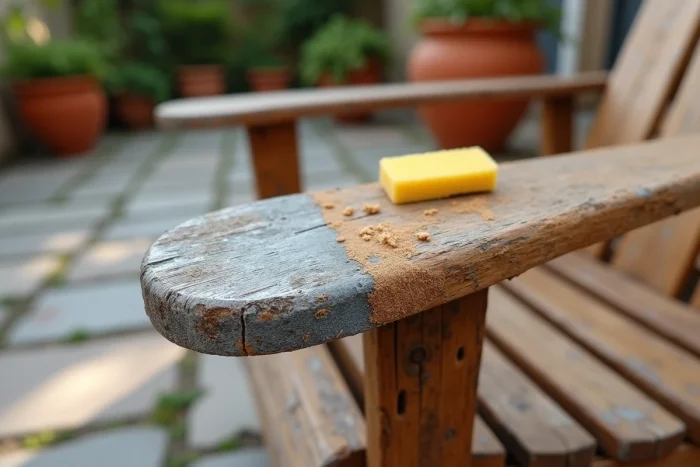
The graying of exterior wood results from a chemical degradation of lignin due to UV rays and moisture. This alteration, superficial in most cases, does not compromise the structure of the material. An appropriate gray remover can restore the original color without resorting to sanding, provided that a precise protocol is followed and a product whose formulation corresponds to the treated wood species is chosen.
Oxalic acid and new formulations: what a wood gray remover really contains
The majority of commercial gray removers rely on an active acidic principle, most often oxalic acid (also known as sorrel salt). This molecule acts through chemical reduction: it breaks down the gray compounds formed on the surface of the wood and releases the natural pigments trapped beneath the oxidized layer.
Further reading : How to Enjoy a Peaceful Rental Experience with Tandem Immobilier Services
Since the revision of the European CLP regulation, several products based on oxalic acid or chlorinated derivatives have been reclassified with stricter hazard warnings, particularly for eye and skin irritation and aquatic risks. This regulatory evolution pushes manufacturers to reformulate their ranges towards less aggressive bases and to strengthen protection instructions on labeling.
Knowing how to gray wood with a gray remover implies understanding this distinction between formulations: a concentrated product to dilute does not act the same way as a ready-to-use gray remover with a more neutral pH. The choice depends as much on the wood species as on the state of graying.
You may also like : Practical tips for digging a hole efficiently with a shovel in your garden
High-pressure rinsing after gray remover: a practice to abandon on outdoor furniture
The reflex to use a high-pressure cleaner after applying a gray remover remains widespread among individuals. Field reports show that this practice causes measurable damage to the wood fibers, particularly on softwoods and exotic woods.
The FCBA (Technological Institute for Forest Cellulose Wood Construction Furniture) has documented in its file on wood terrace pathologies cases of cracking, fiber tearing, and premature graying related to the use of high-pressure jets. Manufacturers present at the Artibat 2023 and Eurobois 2024 trade shows highlighted gray removers designed for low-pressure rinsing or high water volume, combined with gentle manual or mechanical brushing.
On garden furniture (chairs, tables, benches), the wood sections are thinner than on a terrace. A poorly controlled high-pressure jet can gouge the surface in seconds, compromising the adhesion of subsequent finishes. Brushing with a soft nylon brush remains the safest method to remove gray remover residues without damaging the substrate.
Gray removal protocol for outdoor furniture: the important steps
The gray removal of a garden furniture piece follows a logical sequence where each step conditions the next. Skipping a step or poorly preparing the surface negates the benefit of the product.
Preparation and preliminary cleaning
Before any application of gray remover, the surface must be cleared of dirt, moss, and greasy deposits. A cleaning with warm water and black soap is sufficient in most cases. This step allows the gray remover to act directly on the gray layer and not on a film of dirt.
Application of the gray remover
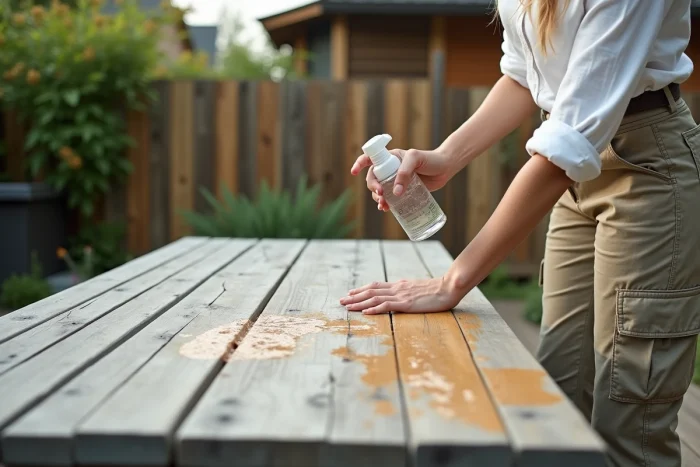
- Apply the product with a wide brush or low-pressure sprayer, in an even layer, on previously dampened wood
- Follow the manufacturer’s indicated application time (variable depending on concentration and ambient temperature) without allowing the product to dry on the surface
- Brush in the direction of the fibers with a soft brush to mechanically detach the gray layer softened by the gray remover
- Rinse thoroughly with plenty of water, without excessive pressure, ensuring that all acidic residues are removed
A often overlooked point: the gray remover must be applied to damp wood, never dry. Pre-moistening prevents the product from penetrating too quickly and creating uneven concentration areas, resulting in a blotchy outcome.
Drying and result control
The wood must dry completely before any visual assessment. The color always appears lighter on wet wood. Allow a minimum of 48 hours of air drying before judging the result and considering the application of a finish.
Protection after gray removal: saturator, oil, and durability of finishes
Gray removal without protection means starting the process over each season. Once the color is restored, the application of a saturator or oil is the only effective barrier against new graying.
The saturator penetrates the wood fibers without forming a surface film. It nourishes the material and partially blocks UV action. The oil works on a similar principle, with more pronounced hydrophobic properties. Both differ from varnish, which creates a waterproof film but eventually peels off on outdoor furniture subjected to the dimensional variations of wood.
Field feedback varies on the durability of a saturator after gray removal. The quality of rinsing plays a direct role: acidic residues left on the surface impair the adhesion of the finishing product and accelerate its degradation. On dense exotic wood (teak, ipe), the penetration of the saturator is slower and may require two thin coats rather than one thick coat.
The frequency of renewal depends on exposure: furniture under a pergola will require less maintenance than a garden set in full sun, exposed to direct rain. Checking the condition of the protection at the beginning of each spring allows for intervention before graying sets in again.
The gray removal of exterior wood is not complex as long as the chemical cause is treated rather than the visual symptom. A well-chosen product, a rinsing without pressure, and a finish applied to clean and dry wood form the triptych of furniture that retains its natural color from season to season.